06 Sep Create Perfectly Print-Ready PDF Files
On Pointe | Create Perfectly Print-Ready PDF Files
We work with a wide variety of clients, ranging from the self-employed individual to corporate businesses. They all share the goal to save as much time and money as possible, and they appreciate our ability to “trim the fat” from their projects. In the quest for the easiest, fastest, most affordable solutions, print-ready files will almost always help.
Incorrectly set-up artwork files cause delays and errors in print projects, and as a result end up costing more.
Poorly set-up files result in images not printing correctly (or sometimes not at all), low-resolution images & pixelated text, content being trimmed off of the final product, uneven margins, folds occurring at the wrong places in a layout, inconsistent colors, and a variety of other issues that often aren’t visible until the first print is viewed.
To effortlessly ensure your files are print-ready, have your artwork set-up by our Pre-Press Designer. They are experienced and trained to spot issues or errors and will correct them quickly, thereby avoiding unexpected time, errors, and fees on your project.
That said, if your business has the ability to create PDF files, doing it correctly can save you time, in addition to saving set-up costs. So what makes a PDF “Print-Ready?” Read on!

What Makes a PDF Print-Ready?
DOCUMENT SIZE
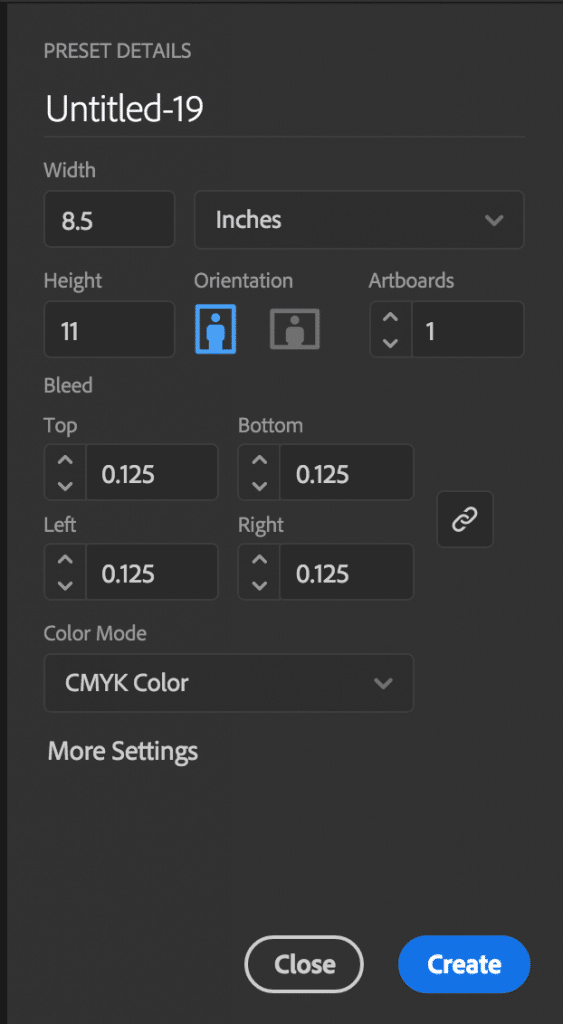
 Using professional design or layout software (such as Adobe Illustrator, InDesign, or PhotoShop) set your document size, and use the preset details window to include .125″ bleeds if needed. Set your margins or guides at a minimum of .25″ on all sides to keep important content
 When saving your print-ready PDF with bleeds, make sure the “trim marks” and “use document bleed settings” features are turned on.
For information on PDF set-up for any alternate programs, such software from Microsoft, CorelDraw, or InkScape, please contact one of our Project Managers. Any questions you have can be relayed to our in-house Designer for help!
BLEED
Your file needs bleeds when a graphic or image is meant to go to the very edge of the finished piece. This is created by printing larger than the finished piece, then trimming the excess to the final size. Plan for 1/8” (.125”) around all edges of a document that bleeds, and be sure to include crop marks.
MARGINS
While a bleed extends off the page, the margins keep all important content within the “safe zone.” This prevents layouts from looking cramped, as well as prevents text and images from being accidentally trimmed off. We recommend 1/4″ margins for most layout sizes, more for large format prints. Without bleeds, documents should have .25″ of white space (empty margin) around all edges.
COLOR PROFILE
Your digital files for print should be in CMYK color mode, which stands for Cyan, Magenta, Yellow, and Black (K). Digital printers use these colors of toner to create the full color spectrum. Set-up your document, as well as images, in CMYK mode to avoid unwanted color conversions when your file prints.
Get help with converting images: Use this handy online converter tool to upload your RGB images to, and it will give you one converted to CMYK for your layout.

RESOLUTION
Image quality is determined by resolution. Standard “print quality” resolution is 300dpi (dots per inch) when an image is set at final print size. Most images from the Internet are “web resolution” which is 72dpi, and as a result will be pixelated when printed.
Find your image resolution, and what size it will print well; use this online tool!
Thanks for reading!
We hope this information helps you effortlessly create Print-Ready PDFs, thereby saving you time and money on future projects. Of course it’s always a good idea to have the experts check your work! The team here at AnchorPointe is standing by to help. Ask a Project Manager any questions about the printing process or file set-up.
Think you have a print-ready PDF? Send it to a Project Manager, and we’ll have our Pre-Press expert verify it for you!


